For those who love shooting and are hobbyists, one of the most popular activities is completing one’s lower receiver to 80 . Lower receivers that has an 80 percent rate is an inferior receiver that requires some work before becoming a completely functional. This is a popular option for gun owners keen on creating guns of their own. However, there is a critical choice to make is: what should you do? Do you build the lower receiver with 80 percent by yourself or consult an expert in this comprehensive guide, we’ll examine the advantages and disadvantages of both choices, along with the necessary tools and information and then assist you in making a well-informed decision.
Understanding 80 Percent Lowers
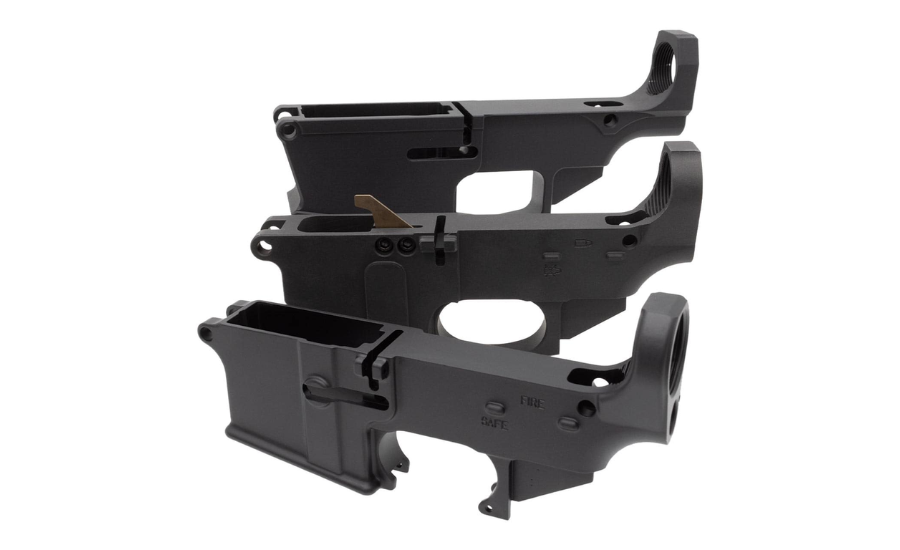
Before launching into the DIY argument amongst DIY and expert, it is critical to understand what’s the definition of an eighty percent lower receiver is. For America the Bureau of Alcohol Tobacco Firearms and Explosives (ATF) defines a lower receiver with an eighty percent lower than a receiver that has no longer been completed and is therefore not deemed to be a firearms. It does now not require registry of the serial quantity, or each other info and is an extraordinary desire for individuals who decide on safety and privacy they preference.
Different kinds with a lower 80%
There are numerous kinds of lowers having a high percent % content that are mostly made of polymer steel or aluminum. Each material is unique and has distinct benefits and drawbacks.
- Aluminium is the best-known of materials known for its strength and endurance. It’s relatively easy to work with employing the right tools.
- Polymer It is light and easy to work with however it’s not as strong like aluminium. Perfect for people who are looking for the most lightweight construction.
- Steel is the most durable option, however it is in addition, the toughest to work with. It requires special tools and expertise.
Legal Questions
While eighty percentage lowers are not deemed to be firearms, it’s far vital which you are privy to prison ramifications that come with having an 80 percent lower. The legal guidelines concerning 80 percent lowers are one-of-a-kind in each country and could exchange as time passes. It is important to live updated on precise legal guidelines, regulations, and neighborhood regulations to make sure you are in conformity.
DIY Approach DIY Approach
Making an lower receiver that is 80 percent by yourself is an enjoyable and informative learning experience. It lets you know the workings of your firearm, and then tailor it to your personal desires. But, it will require the time, tools and knowledge.
tools and equipment
To complete the lower receiver’s 80 %. You will need a variety of equipment and tools, which include:
- Drill Press and Milling Machine is essential to ensure precision when it comes to drilling and milling operations.
- Jig: An device which helps hold your lower receiver in position, as well as guides your cuts and drills.
- Router device is used to mill out the pocket to prevent fire.
- Drill Bits and End Mills The sizes vary for the various components which make up the receiver.
- Safety equipment Eye and ear safety, protective gloves a dust mask.
- Tools to Measure: Calipers, rulers and gauges to take accurate measurements.
as well as Skills and Knowledge
A process for making the higher receiver, which is 80 percent requires an above-mentioned level of mechanical skill and knowledge. You must be comfortable working with the power tools, able to read technical papers and follow specific directions. If you’re unfamiliar with this sort of work it might be helpful to start small with tasks to improve your abilities as well as confidence.
The benefits of DIY Method
- Personal satisfaction finishing the lower receiver on your own is a fantastic method to gain an abundance from fulfillment. It lets you feel satisfied with your work and helps you gain a deeper knowledge of the firearm.
- cost savings Working yourself can help you save money as compared to hiring an expert. The initial expense of the tools could be offset by a reduction in the cost of labor.
- customization: DIY allows you customize the receiver’s lower part to meet the specifications you want regarding the material and final appearance.
Pros and pros and DIY Approach
- It is a long process: completing the lower portion of an 80 percent receiver is the most difficult process to those brand new to the game. It demands concentration and a keen eye for the tiny particulars.
- The possibility of mistakes Mistakes can be costly and result in your lower receiver stop working. It is essential to be exact, even the smallest mistakes can impact the functionality and safety of the firearm.
- Initial investment: The cost of equipment and tools could be significant, particularly when you are starting with a blank slate.
Professional Approach Professional Approach
Utilizing a professional for setting up your receiver’s capacity of 80 percent can provide you with peace of mind and ensure a high-quality end item. Professionals have the experience and tools and experience to complete the job efficiently and accurately.
You can pick an experienced
If you are looking for a professional one, make sure to conduct your own study. Find a trustworthy gunsmith shop or machining facility that has experience in the creation of lower cuts, which is the 80-percent mark. Read reviews or ask for references and verify their credentials.
Pros and Pros and Approach
- Experience: Experts have the knowledge and experience to complete the task properly and effectively. They are more likely to avoid mistakes and will deliver the highest high-quality product.
- Time Savings Professionals Employing a professional can reduce the time and effort needed to finish the task your self. This is particularly useful when you’re lacking time or expertise.
- Security: The professionals observe strict safety guidelines and standards to ensure that your lower receiver is put in place in a secure and appropriate way.
Pros and Cons of a professional approach
- Cost Professionals can run quite a bit, with the cost for labor impacting the overall cost of construction. But, this expense can be recouped with the confidence of a high-quality finished product.
- limited customization: Although professionals have the ability to modify their products, but you may not be able to control the product as much as creating it yourself.
- Time to wait Based on the needs of your professional, it’s likely that you’ll have to wait for the work of your lower receiver to be completed.
Step-by-step instructions to complete the lower 80 percent.
If you decide to take the DIY method Here’s a simple guide to help you navigate the steps to build the lower receiver’s 80 percent capability. This guide assumes you’re using for an aluminum lower receiver and a Jig Router Kit.
Find Your Tools and Materials
Be sure to have all the necessary equipment and materials before you start. This includes:
- 80 percent lower receiver
- Router jig kit
- Press for milling, Drill or Drill
- Router
- Drill bits and end mills
- Tools to measure
- Safety equipment
Set-up Your Work Area
A tidy and well-organized workspace that is spacious with ample space to move around. Make sure you have sufficient illumination and airflow. Install your milling or drill press machine, and place the jig onto your work table.
3. Make sure the receiver is secured to its lower end.
Set the lower receiver at 80 percent within the jig and attach it in accordance with the instructions given by the manufacturer of the jig. Be sure that it’s securely secured and won’t move when drilling or milling.
Step 4: Step 4 The Pilot Drill Holes
With the correct drill bits, you can make pilot holes in the lower receiver according to the jig’s directions. These holes are employed as the reference point when cutting out the pocket to control the fire.
Five Steps Mill your Pocket for Fire Control
Using your end mills and router make sure you take care to cut out the fire-control pocket. Follow the instructions of the jig to ensure you cut precisely. Make sure to make sure to take your time and complete multiple passes, removing only a tiny amount material from each.
Design the drill Trigger as in the Hammer Pin Holes
After the pocket for fire control is cut, drill hole for the trigger pin and hammer pin. Make use of the measuring tools you have to ensure that the pins are placed precisely.
Seventh Step: Finish the step and remove the burr
After the milling and drilling process is done, check the lower part of the receiver for burrs or rough edges. Utilize a deburring tool or file to smooth any flaws.
The Final Assembly
When the lower receiver has been assembled, it’s time to put in the remaining components of the gun. Follow the instructions of the manufacturer to put in the lower components kits as well as the buffer tube and the barrel.
Finalization What’s the distinction between Professional and DIY?
The decision to build your lower receiver’s 80 per cent with your own hands or hire a professional ultimately comes down to your skills along with your resources as well as your individual preference. The DIY method provides a pleasant experience, savings on costs and complete customization, but it requires a substantial amount of effort and the purchase of equipment. However employing the services of a professional can guarantee the best quality product done with the least risk of making mistakes, however it comes costlier and may limit your options of personalization.