
Picture adding the classic beauty and long-lasting strength of natural stone to the outside of your home or office, giving it a stunning look that will last. Stone cladding is a flexible option that improves the look of buildings and serves practical purposes. This article delves into what you need to know about stone cladding.
Types of Stone Cladding
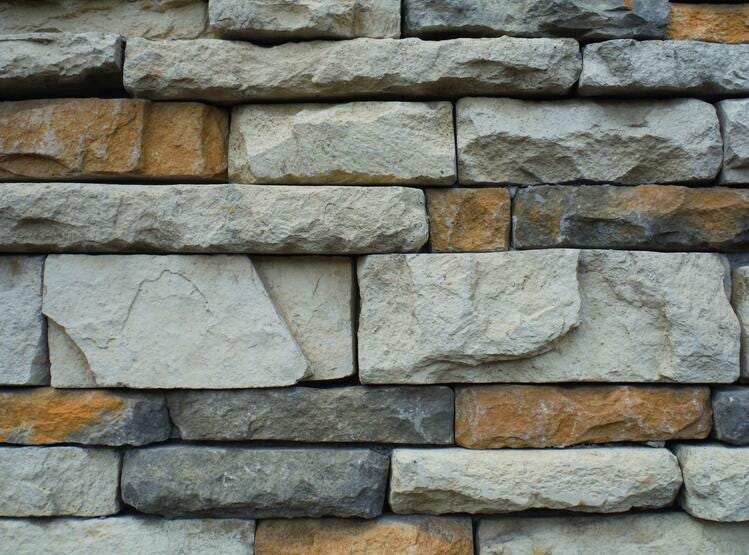
Natural Stone
Natural stone cladding uses materials sourced directly from nature, such as granite, marble, limestone, slate, and sandstone. Each type of natural stone offers unique colors, textures, and patterns that enhance the aesthetic appeal of buildings.
Natural stone cladding not only adds visual interest but also increases the value and longevity of buildings due to their enduring beauty and durability when properly maintained.
Engineered Stone
Engineered stone cladding, also known as composite stone or manufactured stone, is made from a combination of natural stone aggregates and resin binders. This blend allows for greater flexibility in color and texture options compared to natural stone.
Engineered stone is manufactured in controlled environments, ensuring consistent quality and uniformity in appearance. Popular types of engineered stone include quartz and cultured stone.
Faux Stone Cladding
While less durable than natural or engineered stone, faux stone cladding requires minimal maintenance and can withstand weather conditions when installed correctly. Faux stone cladding is suitable for accent walls, fireplace surrounds, and exterior facades, offering versatility and aesthetic value in architectural and interior design projects alike.
How to Install Stone Cladding
1. Determining Materials
The first step in installing stone cladding is determining the materials you need. Start by choosing the type of stone you want. Options include natural stone, like granite or limestone, and manufactured stone, which is lighter and easier to install.
With that, measure the area you want to cover. This helps you calculate how much stone cladding you need. It’s a good idea to buy a bit extra to account for mistakes or cutting pieces to fit. Next, gather other materials. You’ll need mortar, which is the adhesive that holds the stones in place.
Get a metal lath and weather-resistant barrier if you’re installing on a surface that isn’t already prepared, like plywood. The metal lath provides a good grip for the mortar. You’ll also need tools like a trowel, a level, a measuring tape, a hammer, and safety gear like gloves and goggles.
2. Prepping the Surface
Preparing the surface is crucial for a strong and long-lasting stone cladding installation. Start by cleaning the surface. Remove any dirt, dust, or loose materials. A clean surface helps the mortar stick better.
If you are working on wood, you will need to put up a barrier that can stand up to the weather. This prevents moisture from damaging the wood. Over the barrier, attach a metal lath. Use nails or screws to secure it, making sure it’s tight and stable. For masonry surfaces like brick or concrete, roughen the surface if it’s smooth.
This can be done with a wire brush or a hammer and chisel. A rough surface gives the mortar a better grip. Remember, apply a scratch coat of mortar over the metal lath or roughened masonry. Use a trowel to spread the mortar evenly, then use a notched trowel to create horizontal grooves. Wait at least 24 hours before wearing this coat again.
3. Prepping the Stone
Prepping the stone before installation ensures a smooth and efficient process. Start by laying out the stones on the ground in the pattern you want. This helps you visualize the final look and make adjustments as needed.
Clean the back of each stone with a brush to remove any dust or loose particles. This helps the mortar adhere better.
For thicker stones, apply a thin layer of mortar to the back. This is called “back buttering” and ensures a strong bond when you place the stone on the wall. If your stones are irregular in shape, you might need to trim and adjust them as you go. Having a variety of stone sizes and shapes on hand can make this easier.
4. Installing the Stone
Apply a layer of adhesive mortar to the prepared surface using a trowel. Press the stone cladding panels or individual stones firmly into the mortar, starting from the bottom and working upwards.
Use a level to ensure each piece is straight and aligned with neighboring stones. Maintain consistent spacing between stones for a uniform look. Adjust stones as needed before the mortar sets.
5. Grouting
Once the stones are in place and the mortar has cured sufficiently, fill the gaps between the stones with grout. Choose a grout color that complements the stones for a cohesive appearance. Apply the grout using a grout float, pressing it firmly into the gaps and smoothing the surface. Wipe off excess grout with a damp sponge before it hardens.
Stick to the manufacturer’s instructions for letting the grout dry. After curing, clean the stone surface with a damp cloth to remove any remaining grout residue. Seal the stone cladding as recommended to protect it from moisture and dirt, ensuring a long-lasting and attractive finish.
Enhance Your Building with Stone Cladding
Whether used for exterior facades, interior walls, or accent features, stone cladding provides versatility in design and contributes to a building’s structural integrity. So, embrace the beauty of natural stone or the versatility of engineered options to achieve a distinctive look that complements your architectural vision.
Stay in touch for more updates and alerts visit: Hint Insider!